| Details | Adding a Menu EntryThe Menu Entries page can be used to add or edit menu entries. The page lists existing menu entries. You can search for menu entries using the search bar, or filter the list by category or by menu entry type ( ). To edit a menu entry, search for and click the menu entry's name. You can also create a new menu entry from an existing one using the Copy button, this will create a new menu entry will all the properties (except Name) of the copied item. This makes menu management more efficient, especially when creating similar items. ). To edit a menu entry, search for and click the menu entry's name. You can also create a new menu entry from an existing one using the Copy button, this will create a new menu entry will all the properties (except Name) of the copied item. This makes menu management more efficient, especially when creating similar items. 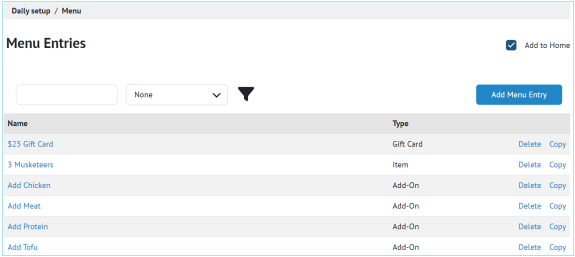
The instructions below detail how to create (add) a new menu entry. These instructions can also be used to edit existing menu entries. Menu entries are assigned to a menu screen here (using the Layout tab). Menu screens are assigned to a Menu Screen Group. Menu Screen Groups are then assigned to departments. The Add Menu Entry page consists of a General, Barcodes, Layout, Countdowns, and — when "Item" or "Non-revenue item" is selected in the "Type" field — a Transformations tab. 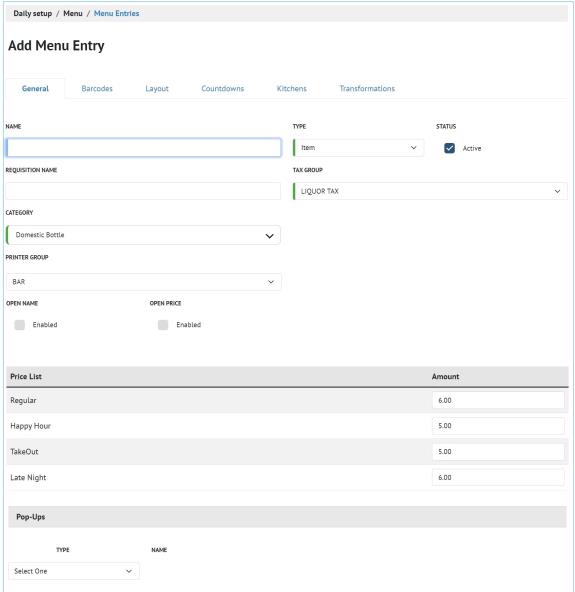
- On the Daily Setup > Menu Entries page, click Add Menu Entry.
- The Add Menu Entry page appears, with the General tab active. Remain on the General tab and complete the following fields:
- Name: Enter the name of the menu entry.
- Type: Select Item, Add-On, Gift Card, Modifier, or Non-Revenue Item.
Items are typically considered to be a main menu entry, such as a beverage.
Modifiers are preparation instructions that must be ordered after an item. For example, wheat, sourdough, and rye are modifiers for toast.
Addons are tangible items and are chargeable. For example, an extra slice of cheese is an addon to a burger.
Note that modifiers and addons can not be ordered separate from an item.
Gift Cards Used when creating gift cards to be sold at POS through a 3rd party provider Non-Revenue Item: Non-revenue generating items include things such as gift cards, catering services, and deposits. Reports split sales between revenue and non-revenue subtotals for any report where payments and sales must balance; for example, non-revenue items appear as a separate subtotal on the Transactions Report. Other sales reports or exports have a parameter to include non-revenue sales. It's important to understand the tax implications of non-revenue sales and ensure they are properly accounting for any income generated from these sources. For example, gift card sales may be subject to sales tax when they are purchased, and the value of the gift card may be subject to income tax when it is redeemed. Similarly, income generated from catering services may be subject to income and self-employment tax. - Status: Leave flagged as Active if you want the menu entry to appear at POS. Unflag if the menu entry is unavailable or shouldn't appear at POS. Items on a countdown will be removed from the countdown list when the item is inactive.
- Requisition Name: (Optional) An alternate name for the menu entry that prints on requisitions. If left blank, the menu entry name (defined in the Name field) prints on requisitions. This field does not affect the name of the menu entry that prints on checks.
- Category: Select a category for the menu entry.
- Tax Group: Select a tax group for the menu entry. This field is unavailable for modifiers, as modifiers are not chargeable.
- Printer Group: Select a printer group for the menu entry. This field is unavailable for addons and modifiers, as both print with the items they are attached to.
- Open Name: Optional flag. Enabling this flag prompts users to enter a name for the item after selecting it at POS.
- Open Price: Optional flag. Enabling this flag removes the ability to set prices for an item in a price list. Instead, users are prompted to enter the item's price after selecting it at POS. This field is unavailable for modifiers, as modifiers are not chargeable.
- Price List: All price lists are listed. Enter a price for the item applicable to each price list. For example, a drink item may have a different "regular" price and "special" price. This area of the page does not appear if Open Price is enabled. This field is also unavailable for modifiers, as modifiers are not chargeable.
- Pop-Ups: If the menu entry should have a pop-up screen or pop-up group appear when selected:
- Under Type, select Pop-up Group or Pop-up Screen.
- Under Name, select the Pop-up group or screen.
- If additional pop-up groups or screens are needed, repeat steps i. and ii.
- Click the Barcodes tab at the top of the screen. To add a barcode to associate with the menu item:

- Select a type of barcode under Type.
- The Barcode field appears. Enter the barcode in this field.
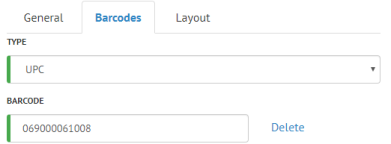 - (Optional) To associate this menu entry with additional barcodes, repeat steps 3a through 3b.
- Click the Layout tab at the top of the screen. To add the menu entry to a screen:
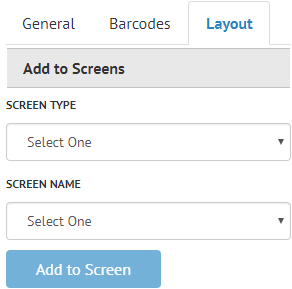 - Under Add to Screens, select a Screen Type and Screen Name. After selecting a screen name, that screen appears under Edit Screen.
- Click Add to Screen. The item appears under Edit Screen.
 - Sort the screen by selecting an option under the Sorting dropdown menu. Selecting Alphabetical will sort the screen alphabetically. Selecting Custom allows you to click and drag menu entries for a custom order.
Items can also be added to Menu Screens on the Edit Menu Screen page. - Click the Countdowns tab at the top of the screen. Countdowns are configured either by store, or by department 1. Once a countdown limit is reached, the menu entry is unavailable in that store (or department in that store). To configure a countdown for the menu entry:
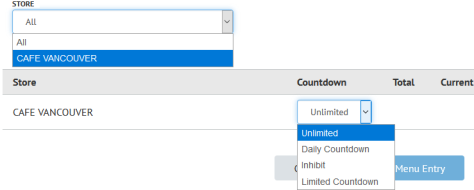
- Select a Store.
- Under Countdown, select or leave as Unlimited (no countdown), Daily Countdown (total amount resets every business day), Inhibited (no count, menu entry is unavailable), or Limited Countdown (limited amount does not reset automatically).
- If you are creating an item ("Item" or "Non-revenue item" was selected under "Type") and the item needs to be linked to an existing transformer, click the Transformations tab. If a new transformer needs to be created to link the menu entry to, save your changes, create the transformer in the Transformers screen, and either link the menu entry there or return to this step to link it on this page. In the example below, a HIGHBALL is being transformed into a DBL HIGHBALL using the <<DBL>> transformer.

- In the Transformer field, select a transformer.
- In the Category field, select the category of the item that the menu entry will be transformed to.
- In the Menu Entry field, select the item the menu entry will be transformed to.
- Click Save Menu Entry.
|
|
|---|