Adding a Department
The Add Department page is where a department is created and configured. A department is the pairing of a store with a revenue center, and it controls which menu screens and prices are used at POS, how checks and seats behave, how covers are counted, and how tips and tip outs are handled.
Departments are not named directly. A department takes its name from the store and revenue center assigned to it. For example, a department assigned to the Squirrel Cafe #6 store and the BAR revenue center is named Squirrel Cafe #6 - BAR.
The fields on the General tab change depending on the Type set on the revenue center you select. A revenue center's type is Checks, Tables, or Takeout, and is set on the Advanced Setup > Revenue Centers page.
On the Advanced Setup > Departments screen, click Add Department. The Add Department page appears with four tabs: General, Tips & Service Charges, Covers, and Actions. Once the department has been saved, reopening it shows a fifth tab, Check Requirements.
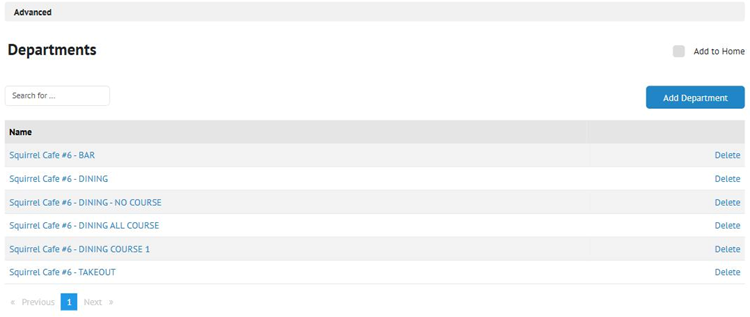
★ The Departments page, showing existing departments named from their store and revenue center.
NOTE: Four fields are mandatory: Store, Revenue Center, Menu Screen Group, and Course Auto-Firing. A mandatory field is marked with a red bar on its left edge, which turns green once the field holds a valid value. The Save Department button stays disabled until all four are complete.
Under the General Tab
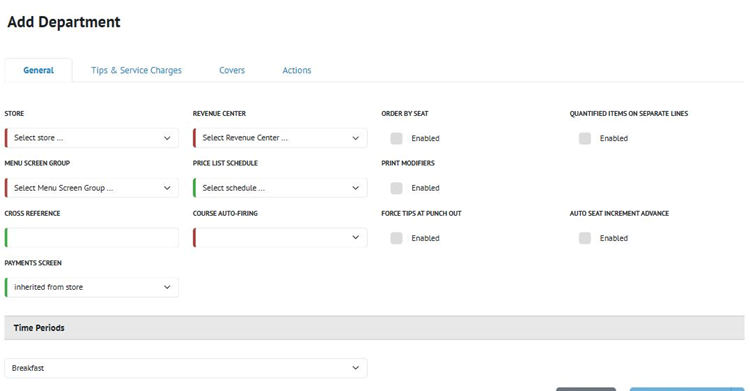
★ The General tab on a new department, before a revenue center is selected.
The following fields apply to every department, whatever the revenue center type.
1. In the Store field, select a store.
2. In the Revenue Center field, select a revenue center. A revenue center can be assigned to a given store only once. If the revenue center you select is already assigned to that store, an error appears when you save.
3. In the Menu Screen Group field, select a menu screen group. This determines which menu screens appear at POS in this department. Menu screen groups are configured on the Daily Setup > Menu > Menu Screen Groups page.
4. In the Price List Schedule field, select a price list schedule. The field is optional, but a schedule should be selected, even if it is simply the default one. Price list schedules are configured on the Advanced Setup > Price List Schedules page.
5. In the Cross Reference field, enter the identifier a third-party integration uses to match its own department to this one. Leave the field empty if no integration requires it.
6. In the Course Auto-Firing field, select one of the following:
• 1st Course: the first course is sent automatically. Items placed on any other course must be fired manually.
• All Courses: all courses are sent at once. No course is fired manually.
• No Course: all courses must be fired manually.
• Not Applicable: coursing is disabled in this department.
7. In the Payments Screen field, select the payment screen this department uses at POS, or leave the field set to inherited from store to use the payment screen configured on the store. Payment screens are configured on the Advanced Setup > Payments > Payment Screens page.
8. Enable the Print Modifiers flag to print modifiers on guest checks.
9. Enable the Force Tips At Punch Out flag to require employees in this department to enter their tip declaration when they punch out, or leave the flag disabled to keep tip declaration separate from punch out.
10. Enable the Auto Seat Increment Advance flag to advance to the next seat automatically as items are ordered, so an order is entered starting at the first seat and moving sequentially.
NOTE: Clearing the Cross Reference field on a department an online ordering integration depends on causes that integration's orders to be rejected. If online orders begin failing after a department is edited, check this field first.
Additional Fields for a Checks-Type Revenue Center
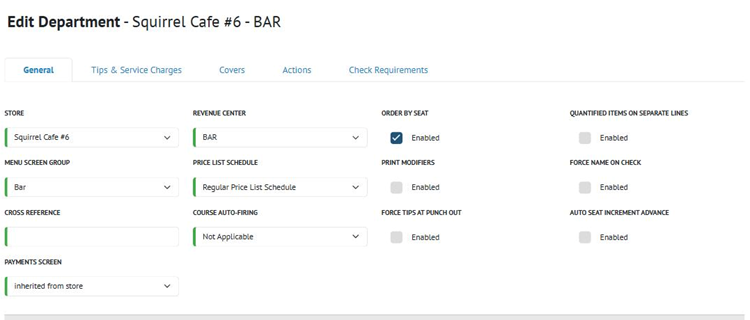
★ The General tab for a department on a Checks-type revenue center.
• Enable the Order by Seat flag if this department uses seating. This enables ordering by seat at POS.
• Enable the Force Name on Check flag to require servers to enter a name for a check when they start an order. The name appears on the onscreen check and prints on the requisition and guest check. With the flag disabled, servers can still enter names; the flag only makes a name mandatory.
• Set the Quantified Items On Separate Lines flag as described under The Quantified Items On Separate Lines Flag, below.
Additional Fields for a Tables-Type Revenue Center
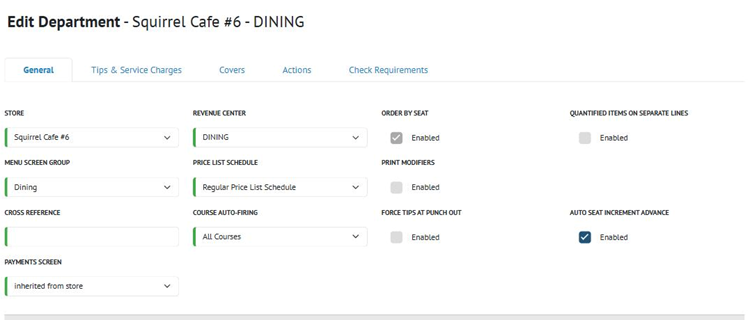
★ The General tab for a department on a Tables-type revenue center. Order by Seat is enabled and cannot be changed.
• The Order by Seat flag is enabled and cannot be changed. Departments on a Tables-type revenue center always order by seat.
• Set the Quantified Items On Separate Lines flag as described under The Quantified Items On Separate Lines Flag, below.
Under Tables, complete the Add [x] new table with [y] seats by default fields and click ADD. This adds that number of tables, each with that number of seats. For example, entering 10 and 4 adds tables 001 to 010, each with four seats. Repeat as needed to add more tables. Table names can be edited in the list below, and a table can be removed with the delete icon at the end of its row.
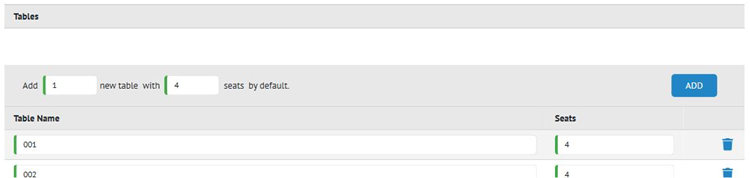
★ The Tables section, available only on a Tables-type revenue center.
Additional Fields for a Takeout-Type Revenue Center
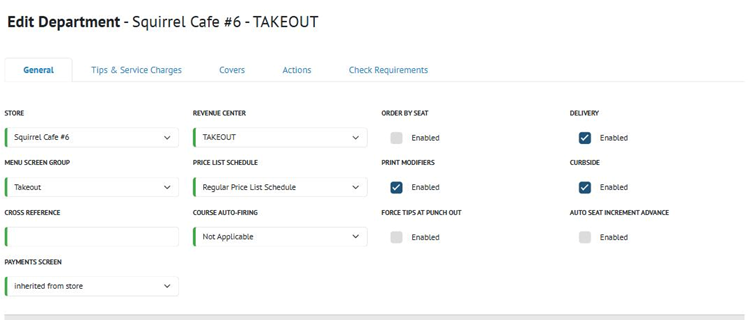
★ The General tab for a department on a Takeout-type revenue center.
A takeout department supports in-store pickup, curbside pickup, and delivery. In-store pickup is always available. Curbside and delivery are enabled with their own flags.
• Enable the Delivery flag to make delivery options available for this department at the terminal.
• Enable the Curbside flag to make curbside pickup options available for this department at the terminal.
• Enable the Order by Seat flag if this department uses seating.
The Quantified Items On Separate Lines flag is not available on a Takeout-type revenue center.
The Quantified Items On Separate Lines Flag
This flag changes how quantified items appear on the onscreen check and print on requisitions and checks. It is available on Checks-type and Tables-type revenue centers only. Enabling it disables Call Order's control over the order in which items appear on requisition slips. For more on Call Order, see the Creating Categories article.
Leave the flag disabled to combine identical items:
• Identical items ordered or adjusted with the Change Qty button combine into one line on the onscreen check.
• Identical items ordered sequentially appear on separate lines on the onscreen check but combine when the order is sent.
• In both cases, identical items print on checks and requisitions on a single line.
• Where Order by Seat is enabled, identical items combine only when they are on the same seat.
Enable the flag to keep identical items separate, as though each had been ordered on its own. This leaves each item individually available for promos, QSAs and similar actions at the terminal:
• Identical items ordered sequentially or adjusted with the Change Qty button appear on separate lines on the onscreen check and do not combine when the order is sent.
• Identical items print on checks and requisitions on separate lines.
Time Periods
Adding time periods is optional. Under Time Periods, select a time period from the dropdown. A Start Time field appears beside it; choose the time that period begins for this department. Repeat as needed to add more time periods, and use Delete to remove one. Time periods themselves are configured on the Advanced Setup > Time Periods page.
Under the Tips & Service Charges Tab
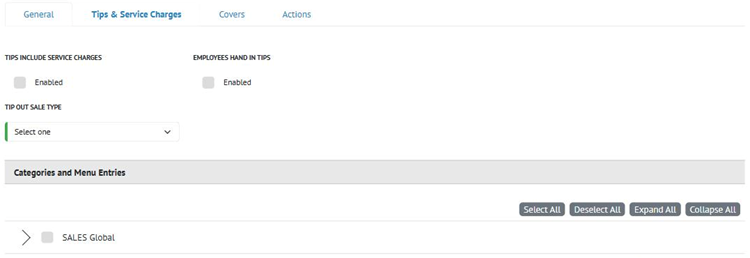
★ The Tips & Service Charges tab.
This tab controls how tips and service charges are reported for the department, and which sales the tip pool is calculated on.
• Enable Tips Include Service Charges to include all service charges added to checks in the tip amount in reports. With the flag disabled, service charges are treated as revenue for the department.
• Enable Employees Hand In Tips if employees hand in their tips at the end of shift for later distribution. Disable it if employees keep their own tips. With the flag enabled, reports and cashouts subtract tips using a Tip Distribution line; with it disabled, they subtract the tip amount from CASH.
• In the Tip Out Sale Type field, select Gross to calculate tip pool percentages on gross sales, or Net to calculate them on net sales.
• Under Categories and Menu Entries, select the categories and menu entries to include in the tip out calculation. Use Expand All and Collapse All to move through the tree, and Select All and Deselect All to set every entry at once.
Tip outs are printed on server cashouts.
NOTE: Categories can be omitted deliberately. An operator who does not want liquor sales counted toward the tip pool would leave the liquor categories unselected here.
Under the Covers Tab

★ The Covers tab.
In the Track Covers field, select how guests are counted in this department:
• Not Applicable (default): covers are not tracked.
• By Menu Entry: guests are counted by the selected menu entries.
• By Seat: guests are counted by seat and selected menu entry.
• Manually: the cover count is entered at POS.
Under the Actions Tab

★ The Actions tab.
This tab sets which action bar the department uses at each level. Select an action bar in the Check, Seat, and Item fields. Action bars are configured on the Advanced Setup > Action Bars page.
Saving the Department
Click Save Department. To save the department and stay on the page, click the arrow beside the button and select Save Department & Stay.
Under the Check Requirements Tab
The Check Requirements tab is not available while a department is being created. It appears once the department has been saved and is reopened from the Departments page.
Check requirements are documented separately. See the Configuring Check Requirements article.