Adding a Printer
Menu items are assigned to printer groups. IP printer profiles are created and assigned to printer groups on the Add Printer page. To create a printer group, see the Creating a Printer Group article.
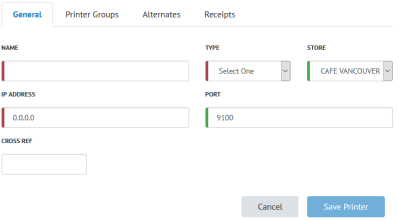
- On the Advanced Setup > Printers page, click Add Printer.
- The Add Printer page appears with the General tab active. Remain on the General tab and complete the following fields:
- Name: Enter a name for the printer.
- Type: Select the printer's model.
- Store: Select the store the printer is being used in.
- IP Address: Enter the printer's IP address.
- Port: Enter the port number. The default port number is 9100.
- (Optional) Cross Ref: Enter a cross reference number for the printer.
- Navigate to the Printer Groups tab. Assign the printer to a printer group or multiple printer groups.
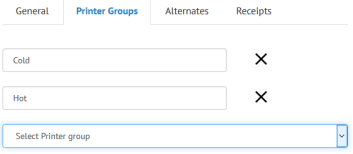
A printer might be assigned to multiple printer groups for expediting purposes, such as accommodating menu entries like hot salads, or entrees that have cold side dishes. For example, an "Expediter" printer can be assigned to both a "Cold" and "Hot" printer group so that the entire order prints at a single printer (i.e. "Expediter") to make it easier for those running the food to the tables. - Navigate to the Alternatives tab. Under Failover Printers, use the dropdown menu to select a backup printer. The next row will appear beneath it with the same dropdown menu, less the already selected printer. Rows can be drag-and-dropped to re-order the list. Continue to select failovers as needed.
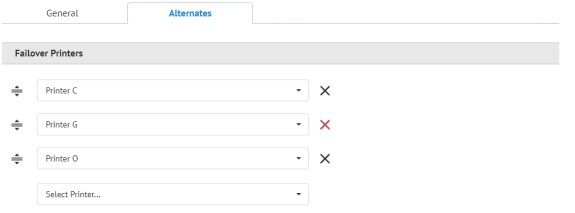
The system will always attempt to print at the primary printer before failing over to the alternative printers (in the order they are listed). If the second printer fails, it will attempt to print at the third, and so on. Every attempt to print restarts the cycle, so there is no manual rerouting required when a printer is brought back online. - Navigate to the Receipts tab. This tab controls the format of material printed from the printer. Not all fields have multiple options. Configure the fields in this tab as follows:
Auto Split: This field controls how checks printed using the Auto Split button are formatted. This should always be set to Sale Detail EN. Auto split checks ignore the Sale field setting and must be printed in a detail format.
Requisition: This field controls how requisitions print when sent to this printer. Choose one of the following options.
- Requisition Detail EN: Prints a detailed requisition by seat number. Does not group like items if the items are on different seats or if the Quantified items on separate lines flag in Department Setup is enabled.
- Requisition Summary EN: Prints a summary of all of the menu entries on the requisition, not separated by seat. Seat numbers are printed beside the items.
- If the Quantified items on separate lines flag in Department Setup is disabled, menu entries with no modifiers or that have identical modifiers are grouped together, while those with different modifiers are listed separately.
- If the Quantified items on separate lines flag in Department Setup is enabled, menu entries are all listed separately.
This example illustrates the differences between Detail and Summary requisitions with the Quantified items on separate lines flag in Department Setup disabled. Three CRISPY CHICKEN BURGER items are ordered; two with fries and salad, one with salad and substituting onion rings.
| Requisition Detail EN | Requisition Summary EN |
|---|
QTY ITEM
Seat #1
-------------------
1 CRISPY CHICKEN
BURGER
fries
salad

Seat #2
-------------------
1 CRISPY CHICKEN
BURGER
fries
salad

Seat #3
-------------------
1 CRISPY CHICKEN
BURGER
salad
Sub Onion Rings |
QTY	ITEM			SEAT #

2 	CRISPY CHICKEN		1, 2
	BURGER
	fries
	salad
1 	CRISPY CHICKEN		3
	BURGER
	salad
Sub Onion Rings |
Sale: This field controls how checks and receipts print when sent to this printer. Choose one of the following options. Unlike the Requisition field, this field is not affected by the Quantified items on separate lines flag in Department Setup.
- Sale Detail EN: Prints a detailed check by seat number. Menu entries with no modifiers or that have identical modifiers are grouped together as long as they are on the same seat. Does not group like items if the items are on different seats.
- Sale Summary EN: Prints a summary of all of the menu entries on the check, not separated by seat. Seat numbers are not printed. Menu entries with no modifiers or that have identical modifiers are grouped together, while those with different modifiers are listed separately.
NOTE: Checks printed using the Auto Split button on a printer set to Sale Summary EN have the behavior of that button overridden by this field, e.g. the checks will print not separated by seat.
This example illustrates the differences between Detail and Summary checks. Three BURGER items are ordered on three different seats; seats one and two have the "american" and "cheese" modifiers applied, while seat three has the "mayo" and "lettuce" modifiers applied.
| Sale Detail EN | Sale Summary EN |
|---|
QTY ITEM AMOUNT | | Seat #1 | -------------------------------- | 1 BURGER - THE WORKS $10.00 | american | cheddar | | Seat #2 | -------------------------------- | 1 BURGER - THE WORKS $10.00 | american | cheddar | | Seat #3 | -------------------------------- | 1 BURGER - THE WORKS $10.00 | mayo | lettuce |
| QTY ITEM AMOUNT | | 2 BURGER - THE WORKS $20.00 | american | cheddar | 1 BURGER - THE WORKS $10.00 | mayo | lettuce |
|
- Click Save Printer.