Interface Setup: Integrations
The Interface Setup (Integrations) page is where connections from Squirrel Cloud to other interfaces are configured.
The page and instructions vary substantially depending on the Interface Type selected. Proceed to the appropriate section of the article below to continue the integration configuration:
Customer Engagement
Customer Engagement is an integration for gift cards. You can easily create and manage gift card programs that are fully integrated with your Cloud POS system.
Note: To configure your DataCandy, you will need certain information that you received when you set up your DataCandy account. This includes your Client Access Key, Merchant Identifier, Merchant Password, as well as the Low and High eight-digit card number range, and the Length card number. If you do not have this information, please get in touch with your DataCandy Representative.
-
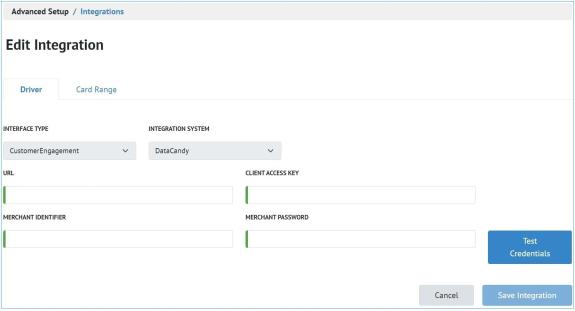
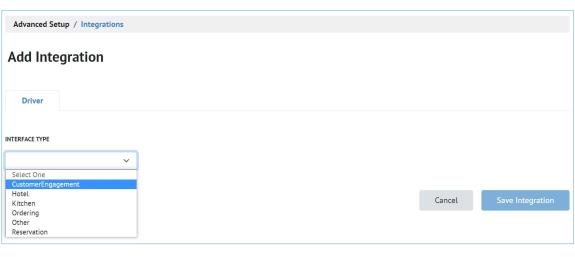
On the Advanced Setup > Integrations page, click Add Integration.
-
In the Interface Type field, select Customer Engagement.

-
Set the Integration System select DataCandy This will automatically take you to the Driver tab
-
In the URL field, enter the following URL:
-
In the Client Access field, enter your client access key that was provided to you by DataCandy.
-
In the Merchant Identifier field, enter your client access key that was provided to you by DataCandy.
-
In the Merchant Password field, enter your client access key that was provided to you by DataCandy.
-
Select Test Credentials to verify configuration settings are correct.
-
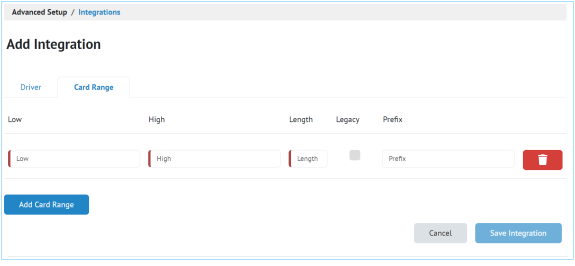
Select the Card Range tab
-
Enter your Low:Enter first eight digits of your Low card number range that was provided to you by DataCandy.
-
Enter your High: Enter your first eight digits of your High card number range that was provided to you by DataCandy.
-
Enter your Length: Enter your card number Length that was provided to you by DataCandy.
-
Select Test Credentials to ensure the settings are correct.
-
Select Save Integration
If you need to configure the system to accept Squirrel CRM Gift Cards, please complete step 15 below. If this is not required, proceed to step 16.
-
Additional steps required to configure the system to accept Squirrel CRM Gift Cards:
-
Configure Menu Entries for any amount that customer wishes to have available for sale, making sure that they are setup as Gift Card types, and with no taxes. Then add them to the appropriate Menu Screen to be available at FOH. Open priced gift cards can be configured as well. Instructions on creating Menu Entries can be found here;
- It is recommended that you create a separate Gift Card category to assign these to for reporting purposes
-
Create a Gift Card payment, making sure that it is assigned to the Gift Card type. Instructions for creating a payment can be found here;
-
Run a test transaction to ensure the integration is set up correctly and working as expected. Instructions on how to sell, redeem, and check a balance of a gift card can be found here:
Note: To configure your Givex, you will need certain information that you received when you set up your Givex account. This includes your Primary URL, Secondary URL, Merchant Identifier, Merchant Password, and Timeout as well as the Low and High eight-digit card number range, and the Length card number. If you do not have this information, please get in touch with your Givex Representative.
-
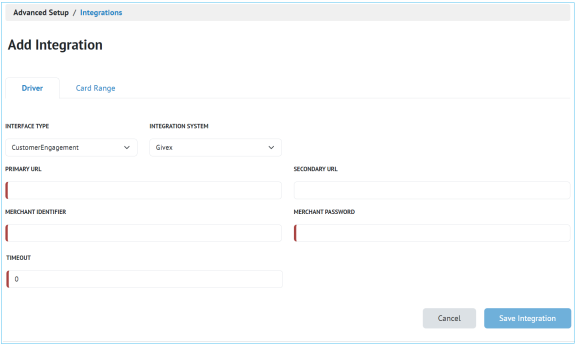
On the Advanced Setup > Integrations page, click Add Integration.
-
In the Interface Type field, select Customer Engagement.
-
Set the Integration System select Givex This will automatically take you to the Driver tab
-
In the Primary URL field, enter the URL provided to you by Givex:
-
In the Secondary URL field, enter your client access key that was provided to you by Givex.
-
In the Merchant Identifier field, enter your client access key that was provided to you by Givex.
-
In the Merchant Password field, enter your client access key that was provided to you by Givex.
-
In the Timeout field, enter 30
-
Select the Card Range tab
-
Enter your Low: Enter first five digits of your Low card number range that was provided to you by Givex.
-
Enter your High: Enter your first five digits of your High card number range that was provided to you by Givex.
-
Enter your Length: Enter your card number Length that was provided to you by Givex.
-
Select Add Card Range
-
Repeat Steps 10-13 for all card ranges accepted.
-
Select Save Integration
Paytronix Loyalty
Before any Paytronix loyalty features are available at the FOH, the integration must be configured with your Paytronix credentials.
NOTE: To configure your Paytronix Loyalty integration, you will need certain information provided by Paytronix for your location. This includes your URL, Merchant ID, Username, Password, and Client Secret code. If you do not have this information, please get in touch with your Paytronix representative.
- On the Advanced Setup > Integrations page, click Add Integration.
- In the Interface Type field, select Customer Engagement.

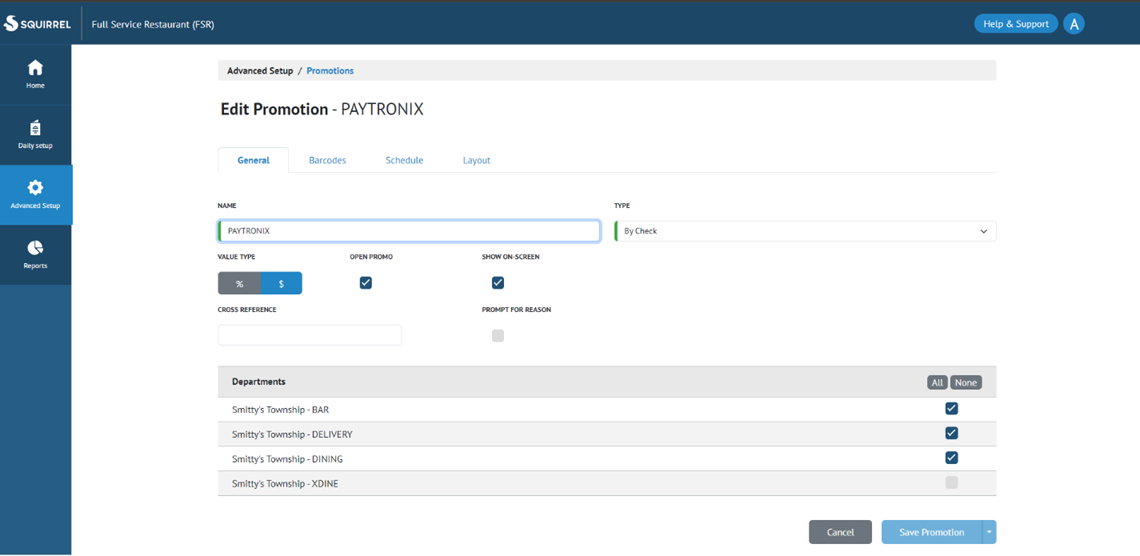
- Under Integration System select Paytronix Loyalty.

- Enter the API credentials provided by Paytronix for your location (URL, Merchant ID, Username, and Password).
- Under Service Mode, select either Automatic or Applicable Rewards -- confirm with Paytronix which mode your account is configured to use.
- If your account uses virtual loyalty cards, enter the Card Template number (provided by Paytronix) in the Card Template Code field.
- Switch to the Store Mapping tab.
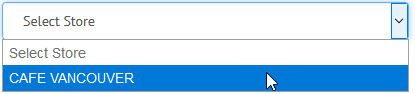
- From the Store dropdown, select the store for this location.
- Enter the Client Secret code provided by Paytronix.
- Click Save Integration.
Configure BOH Promotions
Before loyalty functions can apply discounts at the FOH, corresponding Promotion records must be created in the Back of House. Two types of promotions are needed: a Points Promotion (for redeeming earned Reward Dollars) and one or more Rewards Promotions (for each specific reward type configured in Paytronix).
Points Promotion
This promotion is used when a customer applies accumulated Reward Dollars to their check.
- In the Back of House, navigate to Advanced Setup > Promotions.
- Select Add Promotion.
- Enter a Name (any descriptive name, e.g. Loyalty Points).
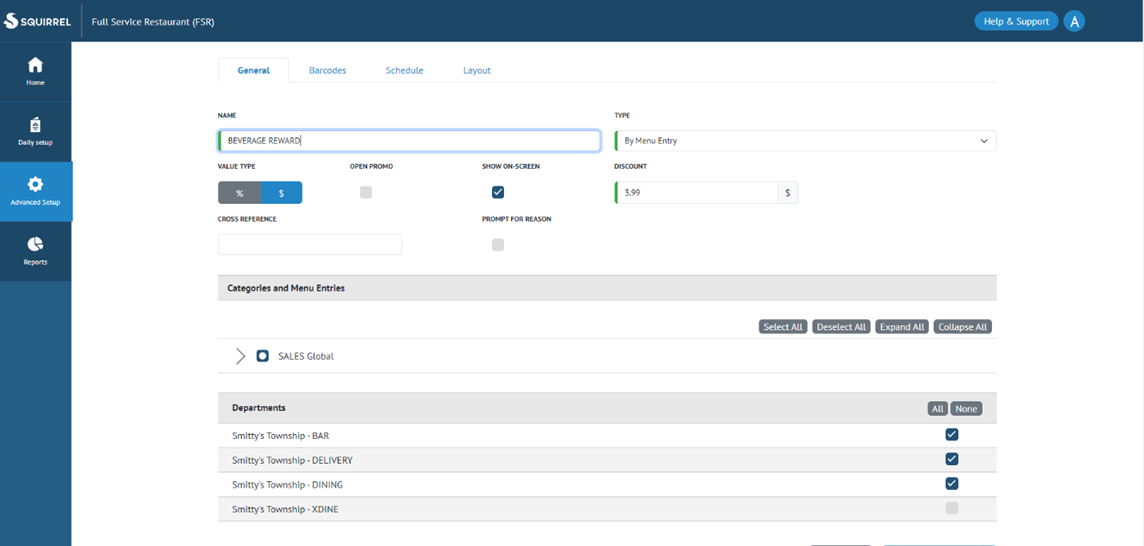
- Set Type to By Check.
- Set Value Type to $ (dollar).
- Select Open Promo -- this must be checked.
- Do NOT select Prompt For Reason.
- Under Departments, select all departments where loyalty should be available.
- Save the promotion.
NOTE: Show On-Screen is optional but can be enabled. This promotion must be Open Promo so the system can apply variable dollar amounts from Paytronix.
Rewards Promotions
These promotions correspond to specific rewards configured in Paytronix -- for example, a birthday reward, anniversary discount, or free menu item. A separate promotion is created for each reward type.
- Navigate to Advanced Setup > Promotions and select Add Promotion.
- Enter a Name that identifies the reward (e.g. Birthday Reward, Free Dessert).
- Set Type based on the reward: select By Seat for dollar-amount rewards (e.g. $10 birthday reward), or By Menu Entry for item-specific rewards (e.g. free dessert).
- Set Value Type to $ (dollar).
- Do NOT select Open Promo for Rewards Promotions.
- In the Discount field, enter the maximum dollar value that can be applied by this reward.
- Do NOT select Prompt For Reason.
- Under Departments, select all departments where the reward should be available.
- For By Menu Entry promotions: under Categories and Menu Entries, select the specific items or categories that are eligible for this reward.
- Save the promotion.
NOTE: For By Menu Entry rewards, the Menu Entry ID for each eligible item must also be provided to Paytronix so they can configure it on their side. The Menu Entry ID is visible in the URL when viewing the menu entry in the Back of House.
Set Up Promotion Mappings (Cross Reference ID)
Paytronix maps each of their promotions to the corresponding Squirrel promotion using the Squirrel Cross Reference ID. This mapping is configured on the Paytronix side -- no changes are made in Squirrel Cloud beyond noting the Cross Reference ID values.
To set up promotion mappings:
- Locate the Cross Reference ID for each Squirrel promotion: in BOH, navigate to Advanced Setup > Promotions, open each promotion, and note the Cross Reference field value.
- Provide each Paytronix promotion name and its corresponding Squirrel Cross Reference ID to your Paytronix account representative.
- Paytronix will configure the mapping on their platform. Once complete, applied promotions will be correctly identified in Squirrel reporting.
NOTE: If promotions are not mapped, they will still apply correctly at the FOH but may appear as a generic entry in Squirrel reporting.
Export the Menu Entry List for Paytronix
To configure item-level reward rules in Paytronix, you can export the Squirrel Cloud menu entry list as a CSV formatted for direct import into the Paytronix platform.
- In the Back of House, navigate to Advanced Setup > Data Export.
- Under Export To select Paytronix.
- Under Export Type select Menu Entry.
- Select the Menu Entries you wish to download.
- Click Export. A CSV file is generated containing all menu entries in the format Paytronix requires.
- Import the CSV file into the Paytronix platform to configure qualifying items for item-level rewards.
The export file includes the following columns in the required Paytronix format:
- Category Name -- the name of the Squirrel category
- Category Type -- minor, major, or promotional
- Item Name -- the Squirrel menu entry name
- Item Type -- Item, Promo, Minor, or Major
- Item Code -- the Squirrel menu entry number
- Mapping Group -- defaults to Default POS Mapping Group
Hotel
A hotel's Property Management System (PMS) is established in order to process room payments. This page also allows the mapping of time periods and sales and tax categories from Squirrel Cloud to the PMS. Squirrel cloud supports the following hotel integrations: Amadeus, Fidelio 3, Opera 4, and Opera POS.
It is possible to have the sales and tax category information defined as one lump amount, or to completely split / have a combination of the categories or the taxes grouped together. Hotel management needs to make the decision regarding the potential breakdown of categories.
Squirrel Cloud only supports communication to PMS through IP. There are no serial configuration options.
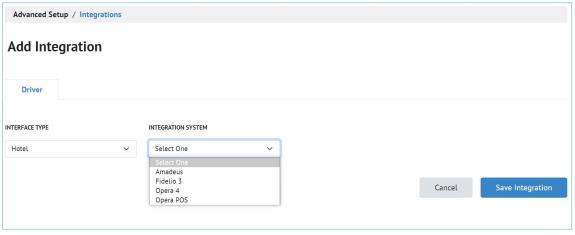
- On the Advanced Setup > Interface Setup page, click Add New Integration Setup.
- In the Interface Type field, select Hotel.
- Set the Integration System field to the PMS being used.
- All PMS Integrations require the following
- In the IP Address field, enter the IP address of the PC running the PMS interface.
- In the Port field, enter the port number the PMS uses to communicate over IP.
- Amadeus requires the following additional steps
- Integration Sub System
- URL; This is determined by the Sub System
- Hotel Code
- Subscription ID: only for PMPRO and IDPMS Sub Systems
- Username
- Password
The information above is suffcient for configuring the system to transfer room payment information.
All Hotel integrations require Sales Classes, Time Periods and Taxes. The below steps will walk through how to configure map sales categories, time periods, or tax categories to the PMS system, continue following the steps in the rest of this section.
- Click the Sales Classes tab. Remain on the Sales Classes tab.
The Sales Classes tab is used to map Squirrel Cloud's categories to the PMS sales categories. Squirrel Cloud's categories are configured on the Categories page (see the Creating Categories article).
The configuration of this tab depends on the number of sales categories the PMS uses. It does not restrict the number Squirrel can use. However, it configures how these categories are summarized to the PMS.
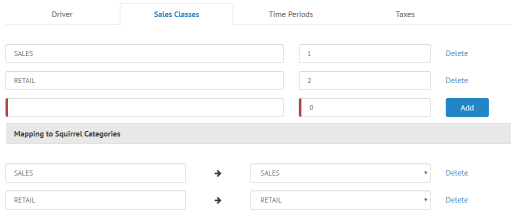
- In the top fields, enter the PMS category names and their numeric ID. Click Add for each entered category / bucket name and ID.
- Under Mapping to Squirrel Categories, map the created PMS categories (left) with the Squirrel Cloud categories (right). You can map multiple Squirrel Cloud categories with a single PMS category by selecting it multiple times in the left field and mapping it to another Squirrel Cloud category in the right field.

- Click the Time Periods tab. Remain on the Time Periods tab.
The Time Periods tab is used to map Squirrel Cloud's time periods to the PMS time periods.
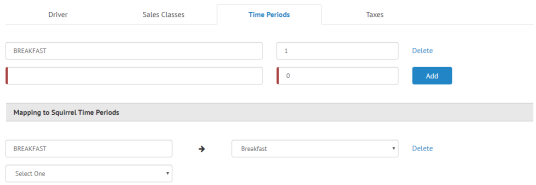
- In the top fields, enter the PMS time period names and their numeric ID. Click Add for each entered time period and ID.
- Under Mapping to Squirrel Time Periods, map the created PMS time periods (left) with the Squirrel Cloud time periods (right).

- Click the Taxes tab. Remain on the Taxes tab.
The Taxes tab is used to map Squirrel Cloud's taxes to the PMS taxes.
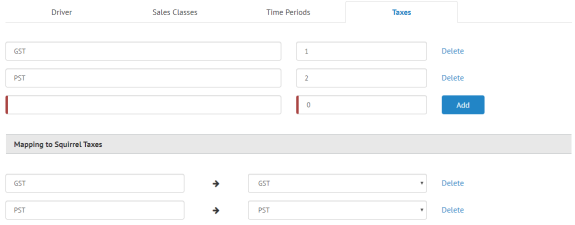
- Under Mapping to Squirrel Taxes, map the created PMS taxes (left) with the Squirrel Cloud taxes (right). You can only map a tax a single time.

- Click Save Interface.
Kitchen
Kitchen integrations, such as QSR, are configured using the "Kitchen" interface type.
- On the Advanced Setup > Interface Setup page, click Add New Integration Setup.
- In the Interface Type field, select Kitchen.
- Set the Integration System field to the kitchen interface being used.
Instructions differ between kitchen systems and are continued in separate sections. Navigate to the appropriate section of the article for the selected integration system.
QSR Cloud
- Navigate to the Site UID tab.
- Select a store.
- Enter the store's unique identifier (UID) in the Site UID field beside the store.

If needed, repeat steps five and six for other stores.
- Click Save Interface.
QSR Relay
- Navigate to the Connections tab.
- Select a store.

- Enter the IP address and port used by the QSR Relay installation for that store.

If needed, repeat steps five and six for other stores.
- Click Save Interface.
Digital Ordering
Currently we offer xDine as a 3rd party integration for online ordering. Xdine's online ordering system allows customers to easily place orders from a restaurant's website or mobile app and requires no configuration setup in Squirrel Cloud Back of House. Additional Integration will be added to this article as they are released.
Reservation
Restaurant reservation system integrations are configured using the "Reservation" interface type.
At this time, only the SevenRooms POS integration is available. Other integrations will be added to this article as they are released.
- On the Advanced Setup > Interface Setup page, click Add New Integration Setup.
- In the Interface Type field, select Kitchen.
- Set the Integration System field to SevenRooms.
- Navigate to the Store Mapping tab.
- Select a store.

- In the Venue ID, Client ID, and Client Secret fields, enter the information provided by SevenRooms.

If needed, repeat steps five and six for other stores.
- Click Save Interface.